
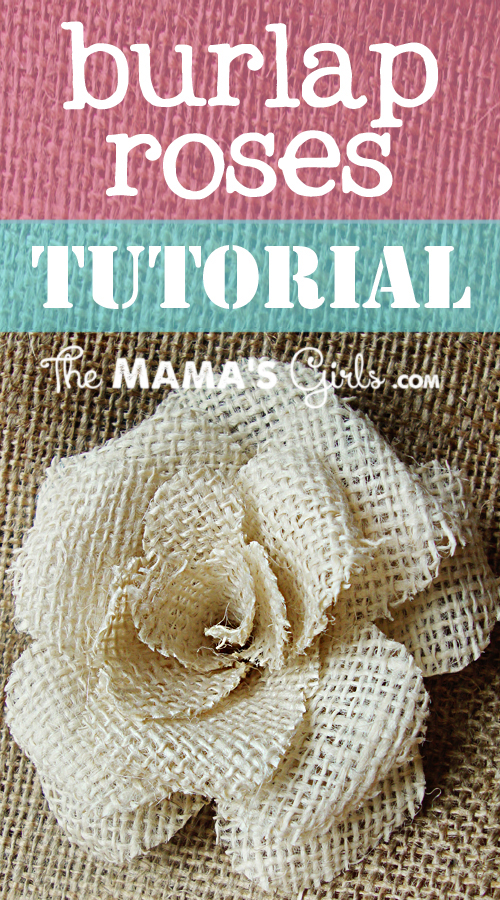
Recently, I went to a wedding reception where these burlap flowers were part of the table decorations! They were gorgeous! I wanted to go home and make some. I looked and looked on Pinterest for a burlap rose tutorial and found several DIY burlap flowers, but none were as pretty as this one. I finally found one that I like. It is exactly what I was looking for. See the Tutorial on YouTube at the bottom of this post. I made these out of the light colored burlap, but they are nice in the tan color as well.
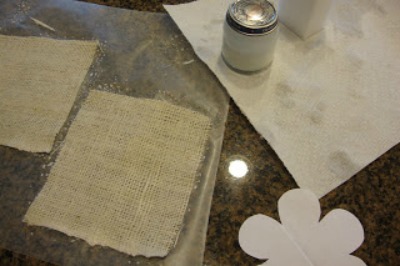
Before the flowers were cut out, I stiffened some burlap with Mod Podge. I dabbed it on with a sponge brush, not too heavy, and allowed them to dry on wax paper.
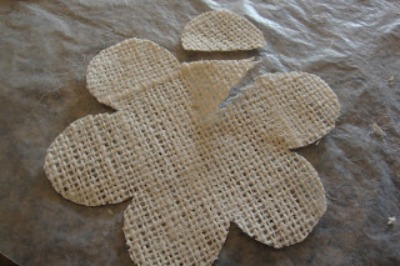
After they were completely dry, I cut out 3 flowers. (I made my own template like this one with 6 petals) You can make the template any size, but the 3 pieces for each flower need to be the same size. On the first flower piece, snip into the center and clip off the rounded part of one petal.
Glue it like this, using a glue gun. Set it aside.
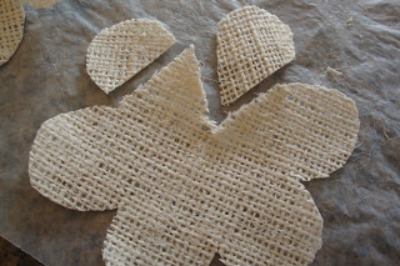
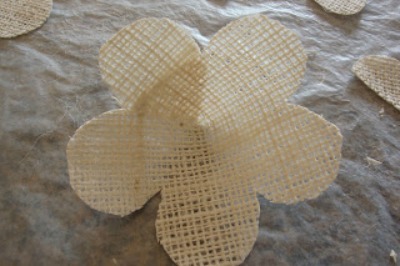
On the second flower piece, snip into the center and completely remove one of the petals. (But don’t throw away the little piece that’s shaped like an “ice cream cone”, you’ll use it later…)
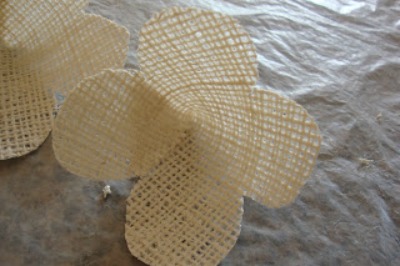
Now glue this second piece like this. Set it aside.
On the third flower piece, cut 2 petals out, and scallop those pedals like this ~ the piece should have 4 little scallops. Also, clip off the rounded part of the next petal. See the photo.
Glue the third piece like this.

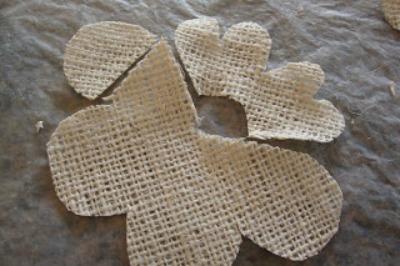
Now roll up the little piece you made that has 4 scallops, and glue it. Next use the little “ice cream cone” shaped piece and cut it to make 2 scallops. Also, snip off the point. (It looks like a little “heart” without the point…you can see it in the background.)
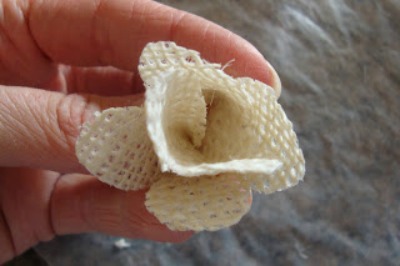
Glue that to the side of the rolled up piece. This is the center of the rose.
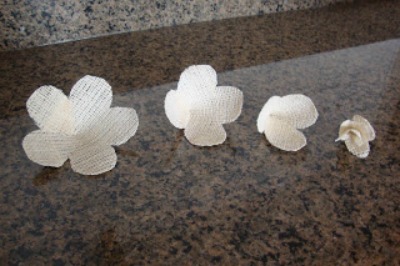
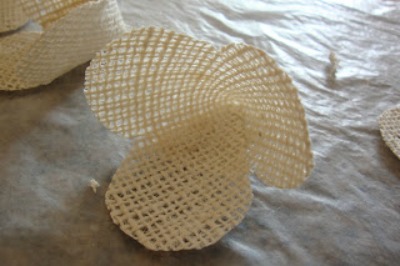
These are the 4 pieces is you should have…
To assemble the flower, roll the pedals outward to give it some shape. Now, just fit the pieces together in order (like the photo above) and hot glue it as you go.
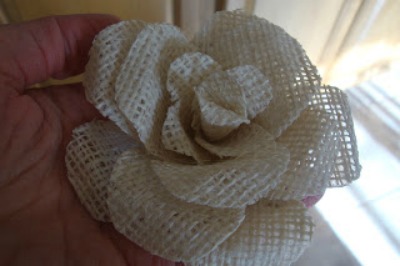
Done! Now make another…
Here is a full tutorial.
I prefer the Mod Podge with Matte Finish for this project!

Thank you for the great tutiorial on the burlap flowers, my niece is getting married and is using burlap in her wedding
I thought maybe I could skip the mod podge…DEFINITELY a no no. Lol. It was so ugly and frayed. So I went back and did it the way you said to do it and they turned out beautiful! Guess maybe I should just follow directions! Haha. Lesson learned.
Don’t worry, I am a HUGE “skim-reader” when it comes to directions. Sometime it fails, and sometimes you end up liking it even better!
Just found your blog from Pinterest. This is an AWESOME tutorial!!!! I can’t wait to try this! I’m now following you!
Hi, I’m also coming from pinterest. Your rose is just gorgeous! Thank oyu for sharing such a detailed tutorial!!!! I must do such a rose immediately 🙂
ciao,
Sofia
Can I please get all of the template?
I have no idea how to make one.
I just love this.
Thank you
Bev in Ohio
There really is not a template. Just as real flowers are all different shapes and sizes, so are these. The one you see pictured is made from about a 5″ circle. Just free hand it and create 6 petals similar to the picture. (Just make sure to cut 3 of the same size for each rose.) You can make the rose any size you like once you learn the technique. I hope this helps. Let me know how yours turn out!
Merci pour ce superbe tutoriel. Thank you for the tutorial
Elisa
Je suis tellement heureuse que vous aimez ces derniers. Elles sont amusantes à faire! (Je peux remercier Google Translate pour m’aider à écrire ça!) I’m so happy you like these. They are fun to make! (I can thank Google translate for helping me write this!)
love your step by step. Especially the part that explains how to make the center of the rose! I have seen so many videos, that neglect to show this part and although I kinda figured it out.. I never thought to scallop the smaller bits.. to make them look like even smaller petals! I appreciate this!
You are so welcome! Thanks for stopping by on our blog. Visit us again for more fun tutorials, recipes and how-to’s!
These are beautiful!! Thanks for sharing!! If I wanted to wire these or attach them to dowels, would the process be the same but just with a hole in the center? Thanks in advance! Xox ❤
I haven’t ever done that with them, but it’s worth a try! Let us know how it works!
Beautiful! Can’t wait to make these for a Christmas wreath. Thanks so much for sharing.
Great tutorial, thanks for sharing x
This is the template used in the YouTube video that I saw. This site has other patterns as well that might work.
http://www.sizzix.com/product/656211/sizzix-originals-die-flower-layers-5
Nice to know! Thank you Pam!
OMG I made them exactly the way you said. .my roses are beautiful. .Thank you so much for the tutorial!
Pingback: Pallet Wreath — The Frumpy Bumpkin
Thank you so much for this. They came out perfect and I even made a few using pink lace. My country chic wedding is going to look fantastic thanks to you. Makes me want to redo all of my centerpieces but I better stick to finishing everything before I try that.
After I originally left a comment I seem to have clicked on the -Notify me
when new comments are added- checkbox and now every time a commdnt is added I receive for emails with the exact same comment.
Is there a means you are able to remove me from that service?
Thanks a lot!
We are working on finding a solution. Is there a place in the e-mail notifications that says unsubscribe at the bottom? Thanks for your patience, let us know if there is and if it solves the problem. Thanks again for reading!
I have made the beautiful Roses now I would like to make them in to a bouquet for my niece wedding and I do not know how to make the bouquet. Can You please help me. I love it the help.
I think that you could hot glue the burlap roses onto a bouquet form (these are actually made for fresh flower bouquets.) Here is a link: Oasis® Bouquet Holders Please send us a picture! We would love to see it!
ME ACABO DE UNIR Y ENCONTRE EL TUTORIAL ESTA LINDO GRACIAS!!!!
Thank you! I’m making some of these to decorate the monogrammed hangers for my daghter’s bridesmaids!
Oh those sound gorgeous! When they’re done, we would love to see them. Email us some pics!
Fantastic tutorial, and easy to follow instuctions. I made these for at my wedding and am so impressed with them. I did change mine slightly. I added two layers of the second layer (the one with four petals) for a fuller look.
Pingback: Step by step instructions for these cute burlap roses! Such… | bingoa !
Pingback: Step by step instructions for these cute burlap roses! Such… | pingoao.com
Pingback: Step by step instructions for these cute burlap roses! Such… | linkoao.com
these are awesome. Thanks for the great tutorial , I actually think I can do this.
I love the picture of these but I can not draw the flower. Could you p;ease e mail one to me?
Love these! Made a few and posted on Facebook and Instagram. People were asking how to so I shared your post. HAPPY TRAFFIC!
These flowers are fun to make, but I had a difficult time finding a good template for the roses. I finally did find one and have been making them a lot. I used the natural burlap and painted it a light peachy color by using some children’s craft paint from the dollar store. I thinned it slightly with water, painted the burlap, let it dry. Then I used craft glue diluted with a little water to stiffen the fabric and it worked just as well as the more expensive fabric stiffeners (4 oz for 50 cents). I used both the natural and the peach colored roses, put them on an artificial green bough and have them on the top of my china cabinet…looks great.